In this article I want to introduce a simple way to approach BLE hacking, covering a bit of theory and giving a practical, low-cost example so you can start having fun with this protocol right away.
For this experiment we will need:
- A smart band like this one: https://shorturl.at/qu1KS I have some called M4, some M5, some M7, and it seems there is not much difference between them. The app they use is FitPro and the experiment should work on all associated devices.
- A rooted Android phone
- An ESP32 of any type (in my case I use an ESP32 WROOM like this one: https://shorturl.at/FOpaM )
Introduction
Even if this blog post does not aim to fully cover the whole BLE world (https://www.bluetooth.com/specifications/specs/), it is important to understand at least the basics, so what we do next actually makes sense.
First of all, let’s clarify that Bluetooth Low Energy is different from Bluetooth Classic:
BLE is designed for low power communication and small data packets, usually between devices like sensors, wearables and smartphones.
Bluetooth Classic is designed for continuous, high-throughput connections, like audio streaming or file transfers.
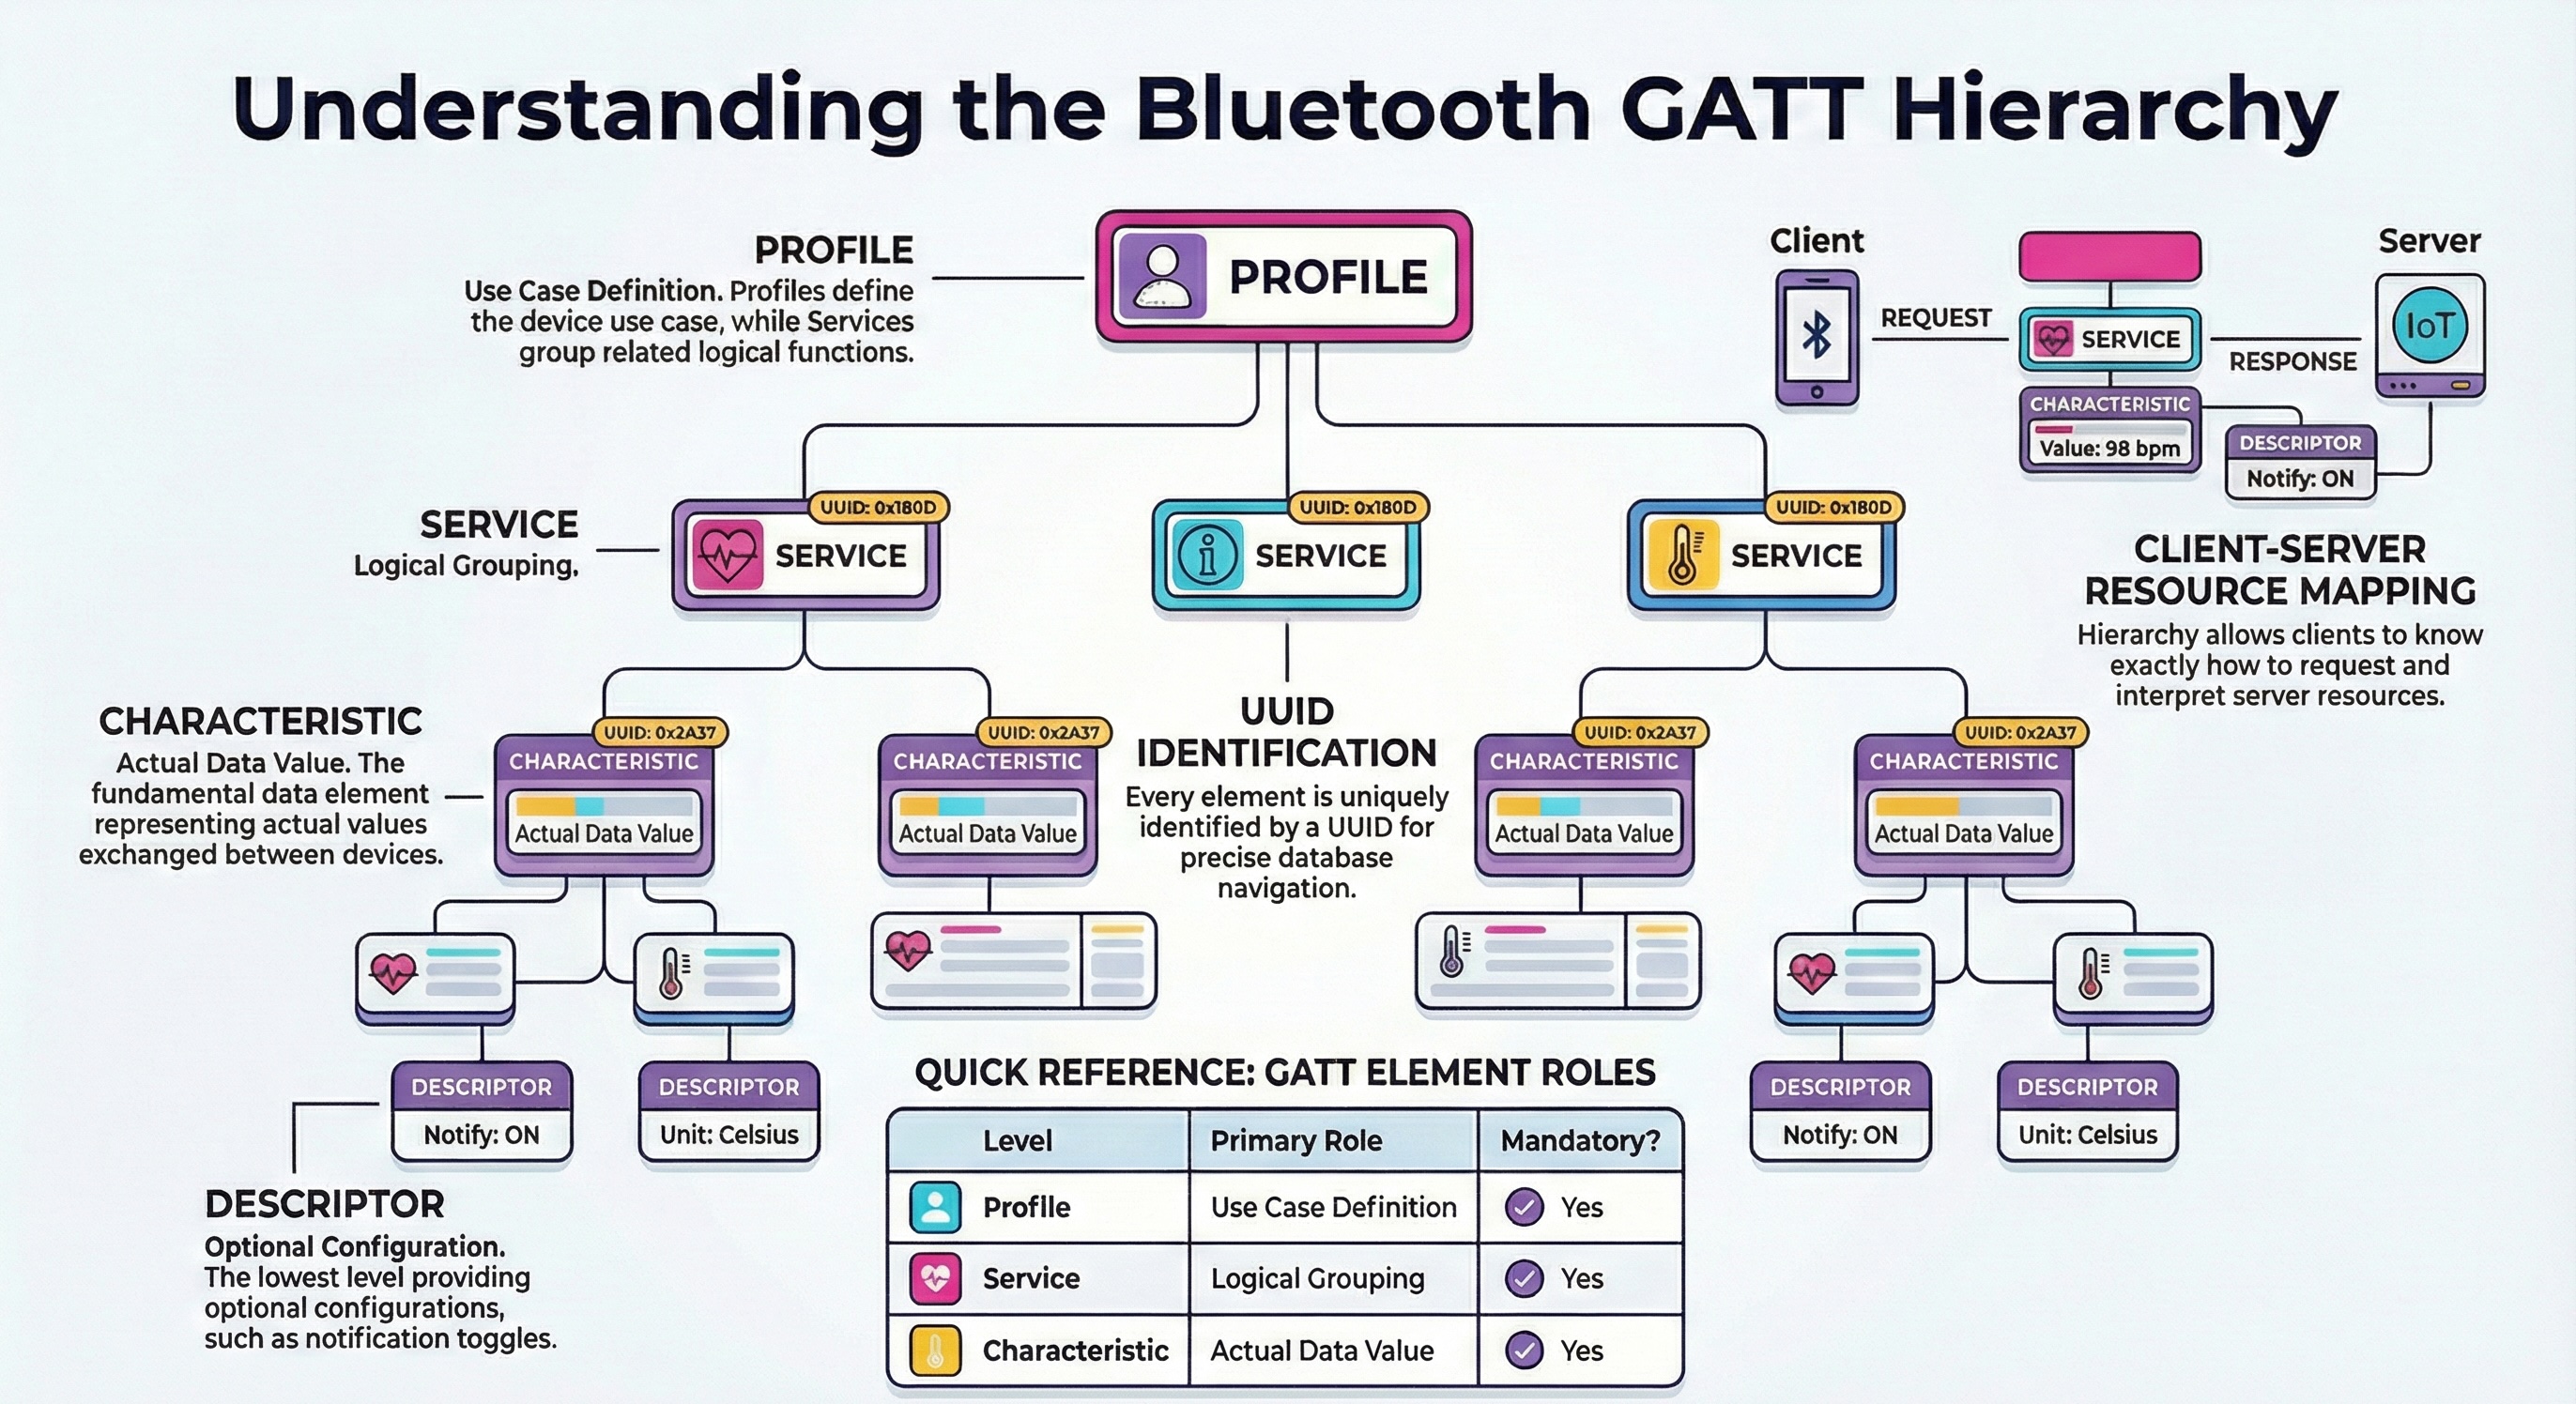
In BLE, communication is based on the concept of services and characteristics, which are exposed by the peripheral device and queried by the client. This creates a modular structure where you can read, write or subscribe to notifications for specific data.
What defines services and characteristics is the GATT (Generic Attribute Profile). This is the protocol that standardizes how data is structured and exchanged between devices.
Alongside GATT, we also have GAP (Generic Access Profile), which defines how devices connect and what role they take.
So in short: GAP is used to establish the connection, and GATT is used to exchange data.
For our experiment, GATT is the most interesting part, because it includes the ability to read and write data. And it would be very interesting if we could write data to the smartwatch and make it do “unexpected” things.
To do this, we will analyze how data is exchanged between the app and the smart band. First we will try to replicate it using bluetoothctl on Linux, and then we will implement the same logic on an ESP32 to create a sort of automatic attacker.
Let’s get into it
The key point is to analyze the app. The steps I describe could also be done using other tools.
If the communication was not encrypted, we could have used a BLE sniffer like an nRF52840 dongle with sniffing firmware.
We could also have used Android’s built-in Bluetooth HCI snoop log to capture and analyze packets.
Today, however, we will use Frida, which is a very powerful tool to intercept the execution of apps, on Android and other platforms.
Initial Frida setup
Download the FitPro app (from the Play Store or other sources).
In my case, I downloaded it online and installed it using adb install because I didn’t want to log in with a Google account on my rooted phone. Normally, though, it’s better to use the Play Store to avoid fake or modified apps.
First, we install frida-tools.
At this stage, you might run into errors because it is very important that frida, frida-tools and frida-server all have the exact same version, and that this version is compatible with your CPU architecture and Android version.
In my case, I used a OnePlus 8. With version 17.6.2 (the latest at the time), I had many issues, so I downgraded to 15.2.2, which I had already used in the past and knew worked well.
python3 -m venv venv
source venv/bin/activate
pip install frida==15.2.2 frida-tools

frida --version
15.2.2
Now we install frida-server on Android.
You will need adb and developer options enabled on the phone (and root access, as mentioned before).
First, let’s check the CPU architecture:
adb shell getprop ro.product.cpu.abi
arm64-v8a
Then go to the releases page:
https://github.com/frida/frida/releases
And download the correct version for your device, in this case:
frida-server-15.2.2-android-arm64.xz
To decompress it:
unxz frida-server-15.2.2-android-arm64.xz
Then push and start the server:
adb root
adb push frida-server-15.2.2-android-arm64 /data/local/tmp/frida-server
adb shell "chmod 755 /data/local/tmp/frida-server"
adb shell "/data/local/tmp/frida-server &"
On your PC, we can do a simple smoke test:
frida-ps -U
If you see a list of processes, everything is working.
Writing the Frida hook
Now we have Frida working and the FitPro app ready to be analyzed.
The goal here is to intercept in real time the data that the app sends to the smart band over BLE, so we can understand what is written, where it is written, and in what format.
In other words, we want to “sit in the middle” between the app and Android’s Bluetooth stack, and watch the Java calls that write to GATT characteristics.
On Android, when an app wants to send data to a BLE device, the flow usually looks like this:
- The app prepares a byte array with the command.
- It sets this array on a
BluetoothGattCharacteristicusingsetValue(...). - It asks the system to send it using
BluetoothGatt.writeCharacteristic(...).
By hooking both of these points, we get:
- The raw value when it is prepared in memory.
- The exact moment when it is actually sent over the air, with the target characteristic UUID.
This gives us a full view of the proprietary protocol used by the smart band.
Below is the full hook code, with comments:
// Check if the Java runtime is available (Frida is attached to a Java-based app)
if (Java.available) {

    // Execute this function inside the Java VM context
    Java.perform(function () {

        // Get references to Android Bluetooth classes
        var BluetoothGatt = Java.use("android.bluetooth.BluetoothGatt");
        var BluetoothGattCharacteristic = Java.use("android.bluetooth.BluetoothGattCharacteristic");

        // Helper function: converts a byte array into a readable hex string
        // Example: [10, 255, 3] -> "0a ff 03"
        function bytesToHex(bytes) {
            var result = [];
            for (var i = 0; i < bytes.length; i++) {
                // Convert signed byte to unsigned
                var b = bytes[i] & 0xff;

                // Convert to hex and pad with leading zero if needed
                result.push(('0' + b.toString(16)).slice(-2));
            }
            return result.join(' ');
        }

        // Hook the writeCharacteristic method to intercept BLE write operations
        BluetoothGatt.writeCharacteristic.implementation = function (ch) {
            try {
                // Get the UUID of the characteristic being written
                var uuid = ch.getUuid().toString();

                // Get the value being written to the characteristic
                var value = ch.getValue();

                // Log the data in hex format if present
                if (value) {
                    console.log("[BLE WRITE =>] UUID: " + uuid + " DATA: " + bytesToHex(value));
                } else {
                    console.log("[BLE WRITE =>] UUID: " + uuid + " DATA: <null>");
                }
            } catch (e) {
                // Log any errors during inspection
                console.log("[BLE WRITE =>] error reading data: " + e);
            }

            // Call the original writeCharacteristic method
            return this.writeCharacteristic(ch);
        };

        // Hook the setValue(byte[]) method of BluetoothGattCharacteristic
        BluetoothGattCharacteristic.setValue.overload('[B').implementation = function (bytes) {
            try {
                // Get the UUID of the characteristic whose value is being set
                var uuid = this.getUuid().toString();

                // Log the data being set in hex format
                console.log("[BLE SET   =>] UUID: " + uuid + " DATA: " + bytesToHex(bytes));
            } catch (e) {
                // Log any errors during inspection
                console.log("[BLE SET   =>] error: " + e);
            }

            // Call the original setValue method
            return this.setValue(bytes);
        };

        // Confirm that the BLE hooks are active
        console.log("[+] BLE Write hook installed");
    });
}
Running the hook
Now we can start the FitPro app and pair the smart band.
Connect the phone to the PC and make sure Frida server is running.
From the app, perform an action that triggers communication. For some reason, I always end up making the devices vibrate (https://mandomat.github.io/2023-11-13-denial-of-pleasure/), so I used the “find” button, which makes the band vibrate.
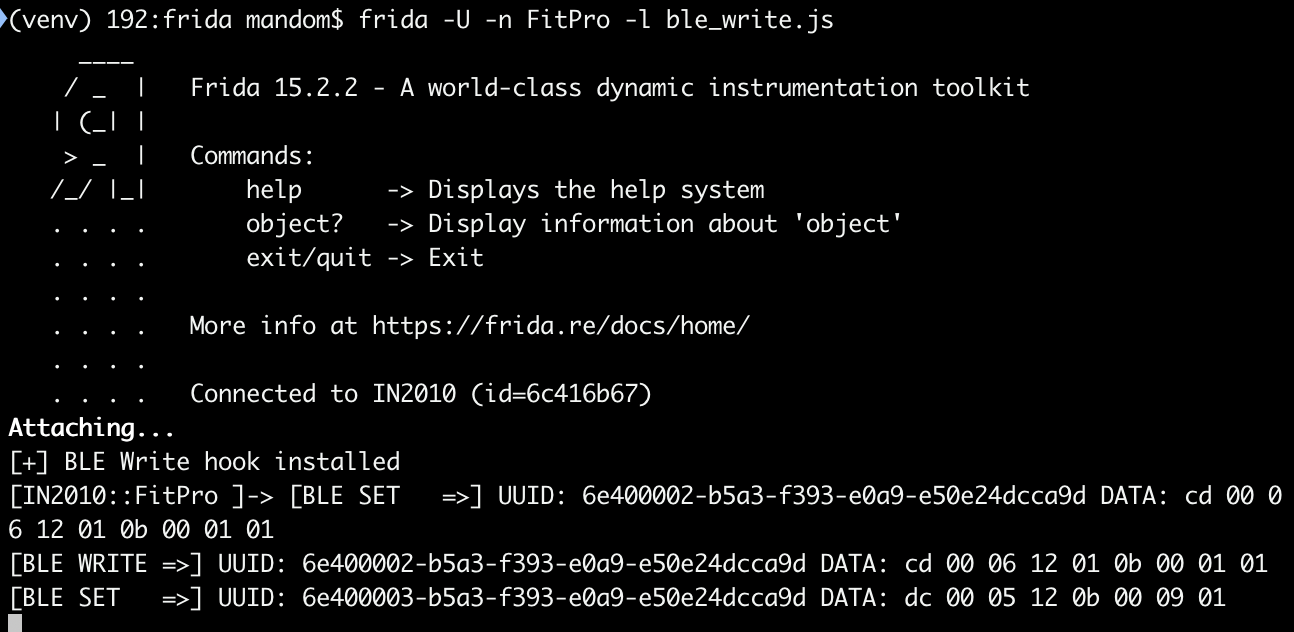
You should now see the intercepted writes in the terminal.
What you will notice is that for a single action, you often see two different log lines: one BLE SET and one BLE WRITE.
SET shows when the app prepares the command in memory.
WRITE shows when the data is actually sent over BLE.
Sometime they can be different because the app or the Bluetooth stack may modify the packet between preparation and transmission, for example by adding control bytes or length fields.
If your goal is to replicate the behavior, the WRITE data is usually the most important one.
Testing the flow with bluetoothctl
Now that we have the command, let’s check if it really works by sending it manually.
On most Linux systems, bluetoothctl is already installed. If not, install BlueZ:
sudo apt install bluez
Then start:
bluetoothctl
scan on
Find your device and connect using its MAC address:
connect FF:FF:4F:10:BE:FA
You will be asked to accept pairing. Type yes.
![[716]# Request authorization](/assets/img/2026-02-04/authorization.png)
This step is important, because it shows that the connection is encrypted. This means that simple sniffing would probably not have been enough, since the pairing process sets up encryption keys.
Once connected, you can list services and characteristics:
gatt.list-attributes
From our hook, we know we are looking for this UUID:
6e400002-b5a3-f393-e0a9-e50e24dcca9d
![[716]# [NEW] Characteristic](/assets/img/2026-02-04/characteristic.png)
Select the characteristic
gatt.select-attribute /org/bluez/hci0/dev_FF_FF_FF_23_DB_18/service002e/char0032
and write the payload:
gatt.write "0xcd 0x00 0x06 0x12 0x01 0x0b 0x00 0x01 0x01"
If everything is correct, the smart band should vibrate.
Automating everything with ESP32
Now we have everything we need: we know which characteristic to write and which bytes to send.
Until now, we did everything manually with bluetoothctl. Now we move to an ESP32 that acts as a BLE client and does everything automatically.
The idea is simple: the ESP32 will scan for the device, connect, handle pairing, find the service and characteristic, and then send the same payload we captured with Frida.
I won’t go through the code line by line, because it just follows the same logic, plus two LEDs:
- A green LED that shows scanning/connecting.
- A white LED that turns on when the “attack” happens.
the full code is here https://gist.github.com/mandomat/868400b150218317527def3c8886082c
Conclusion & Future Work
In this article, we saw how, starting from a cheap wearable and a rooted Android phone, it is possible to analyze and replicate a proprietary BLE protocol without expensive or complex hardware.
The goal is not just to “make a smartwatch vibrate”, but to learn a reusable method:
- Analyze the app
- Intercept function calls
- Identify critical characteristics
- Automate the interaction
The same approach can be used on smart locks, lights, industrial sensors, and many other BLE devices that expose sensitive features through GATT.
A natural evolution of this project is to make the attack fully automatic and scalable, using the NimBLE stack on ESP32 instead of the more classic BLE libraries.
The idea would be:
- Continuous scanning: the ESP32 listens for all BLE devices that match a pattern (name, service UUID, manufacturer data, etc.).
- Automatic connection: it connects and pairs with each matching device.
- Targeted discovery: it searches directly for the characteristic of interest.
- Write broadcast-like: it sends the command to all compatible devices, one by one or in parallel, simulating an “application-level broadcast” over BLE.